
Got an hour to spare and a dining-table corner begging for a burst of color? These eight projects were hand-picked from my own weekend victories—and yes, a few glorious flops—so you can jump straight to the fun part without hunting for specialty tools or studio space.
Brew your favorite tea, cue up a mellow playlist, and let’s turn everyday bits and bobs into brag-worthy décor.
1. Curated Photo Collage Wall
Nothing rescues a blank wall faster than a collage that feels equal parts gallery and scrapbook. Start by printing eight to ten favorite snapshots in varying sizes—matte finish photographs look polished, but color-laser copies on thick paper do the job if you’re on a budget. Trim the edges with a paper trimmer for razor-sharp lines (plain scissors work too, but the crisp border really sells the “pro” vibe).
Spread the images on the floor first, shuffling until the arrangement feels balanced: mix portrait and landscape orientations, nestle a candid laughing shot beside a moody landscape, overlapping corners to avoid a stiff grid.
When you’re happy, snap a quick phone photo for reference. Adhere the pictures to a sheet of heavyweight cardstock using double-sided tape, then mount the whole piece in a thrift-shop frame sprayed matte black. The result? A statement wall that whispers “art school grad” without the tuition bill.
2. Showcase Board for Your Acrylic Pins

If your dresser drawer hides a growing stash of convention swag, turn that secret obsession into focal-point art. Stretch a neutral-toned linen remnant over a thick corkboard, anchoring the fabric with a staple gun at the back.
Pop the panel into a chunky vintage frame—gold leaf or distressed wood both add drama.
Now the fun: arrange your acrylic pins in loose clusters—think color families, fandom themes, or a spiral that pulls the eye inward. Because cork hides under the linen, each pin presses in smoothly yet stays secure.
Swap pieces out whenever you snag a new design, and your display keeps evolving alongside your collection.
3. Painterly Canvas Tote
Canvas totes are the unsung heroes of every grocery run, but the standard beige? Yawn. Lay a blank cotton bag flat, sliding a magazine or cereal box inside to prevent bleed-through.
Sketch bold organic shapes—oversized petals, wavy stripes, or an abstract sunrise—directly onto the fabric with a washable marker. Then dive in with fabric paints: two main shades plus a crisp white keep things cohesive.
I’m a fan of broad, confident brushstrokes; perfection is overrated, and those little wiggles read as charmingly hand-made. Once the paint is bone dry, flip the tote inside-out, press with an iron on medium heat for three minutes, and voilà—your design is laundry-safe.
Come Saturday morning, sling your new tote over your shoulder, and don’t be surprised when strangers ask which boutique stocks it.
4. Windowsill Mason-Jar Herb Garden
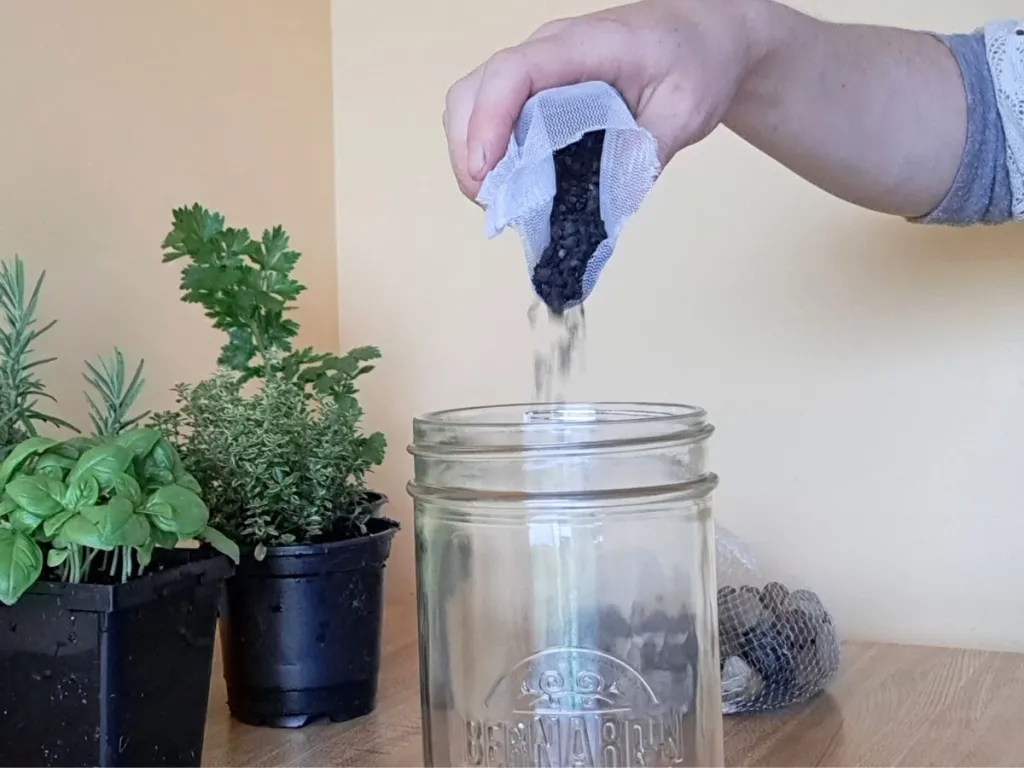
Source: harvestingqualitythyme.com
No balcony? No problem. Rinse three mason jars, affix a strip of masking tape halfway up each exterior, and coat the lower halves with chalky pastel spray paint. When the paint dries, peel the tape to reveal a crisp color block.
Spoon in organic potting soil and sow basil, parsley, and mint seeds. Label each jar with a white paint pen so guests know their garnish options.
Water sparingly—roots drown faster in glass than in terracotta—then position the trio on the brightest kitchen ledge you have.
Over the next few weeks, you’ll witness tiny green shoots curling toward the sun, and before you know it, you’ll be tearing fragrant leaves straight into omelets and mojitos. Herb snips plus sunrise light equals a daily serotonin hit.
5. No-Sew Fleece Throw for Movie Night
Fleece throws look store-bought elegant yet requires skills no tougher than cutting and knotting. Stack one meter of printed fleece atop one meter of a complementary solid. Trim to identical rectangles, then slice 10-centimeter fringes around all four edges, spacing each cut about 1.5 centimeters apart.
Knotting Guide
- Tie the top fringe pair once, then a second time for a secure square knot.
- Shake out the blanket outdoors to ditch stray fuzz.
- Toss it in a gentle wash before first use; double knots prevent unraveling.
The finished blanket drapes softly washes beautifully and costs less than a streaming subscription. Curl up, press play, and enjoy bragging rights when friends ask which boutique sold you that chic gingham throw.
6. Beginner Macramé Plant Hanger
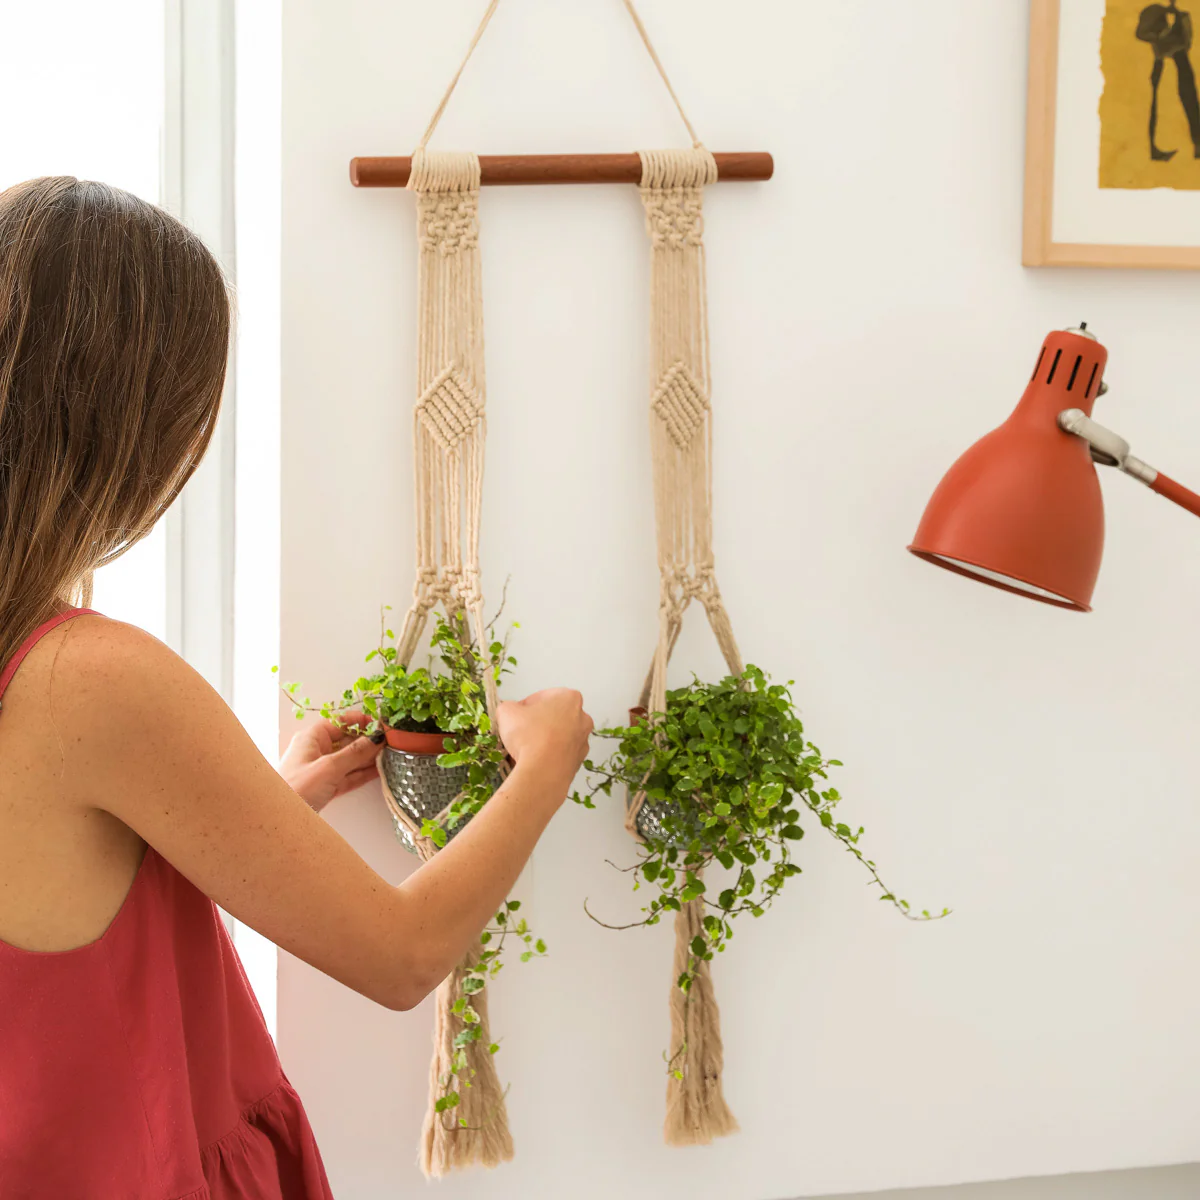
Source: funemstudio.com
Macramé is pure therapy for restless hands, and this plant hanger proves you don’t need fancy tools to create something beautiful. Start with six lengths of 2.5-meter cotton cord (3 mm thick). Fold them in half and loop over a wooden ring—you’ll have twelve strands hanging down like a soft curtain. Hang the ring on a doorknob to keep your cords steady as you work, then let the gentle rhythm of knotting take over and transform those cords into a chic cradle for your favorite pot.
- First row of square knots: Tie about 15 cm below the ring to form a decorative top band.
- Create the cradle: Divide the strands into groups of four and tie another row of square knots 14 cm lower. Repeat once more to deepen the basket shape.
- Finish the base: Gather all the strands and tie a large wrap knot to lock everything together at the bottom.
Slip in a 12 cm terracotta pot, adjust the tension so the cords hug the pot snugly, and trim any uneven ends. You can leave the tails neat or brush them out into soft tassels for a relaxed, boho finish. The end result? A plant hanger that looks like a boutique find but came together while you sipped tea and listened to your favorite playlist.
7. Upcycled Glass-Bottle Lanterns
Next time your dinner party empties a few wine bottles, stash them for this quick alchemy. Submerge bottles in warm soapy water to loosen labels; stubborn adhesive yields to a swipe of nail-polish remover. Once glass is squeaky clean, spoon a mix of two tablespoons craft glue and a dusting of iridescent glitter inside each bottle, swirling until the interior shimmers faintly.
Feed a strand of battery-powered fairy lights through the neck—most sets come with bendable wire that stays exactly where you nudge it. Cluster three bottles of different heights on a reclaimed-wood tray, hide the battery packs under a sprig of eucalyptus, and click the switch. Instantly, your balcony morphs into a midsummer dreamscape worthy of late-night iced rosé chats.
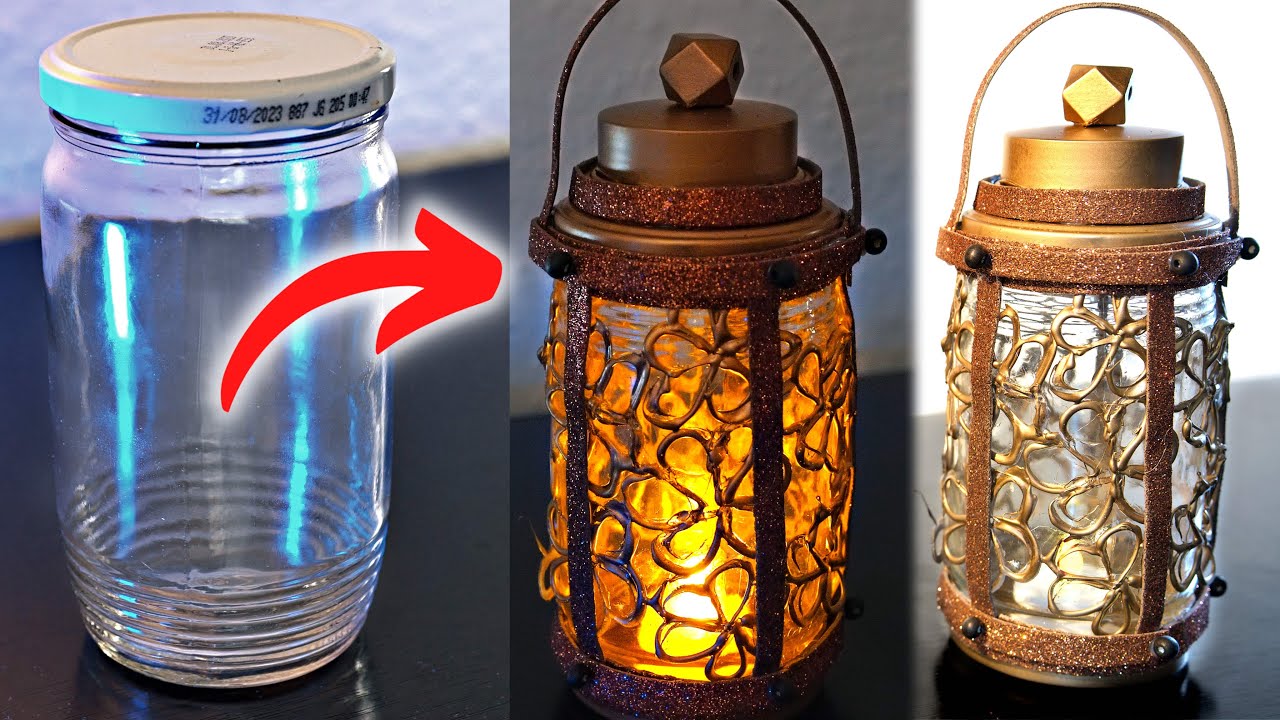
Source: youtube.com
Crafting Confidence ─ Your Next Steps
You now hold eight paths to instant creative gratification, all road-tested in my snug city kitchen. The secret thread among them isn’t perfect technique; it’s momentum. Pick the idea that makes your heart tick faster—maybe the linen pin board, maybe the glowing wine bottles—and start tonight, before self-doubt muscles in. Keep scraps in a shoebox for future spur-of-the-moment sessions, and treat every finished piece as a permission slip to try the next.
Soon you’ll notice something delightful: friends stop by and ask, “Where did you get that?” and you’ll grin, shrug, and say, “Oh, this old thing? I made it.” Nothing beats that blend of pride and surprise—except perhaps the comforting weight of a fleece throw on your lap while your handcrafted tealights flicker in the background. Happy making!


